OPC Viewer Getting Started |
This guide describes the default configuration (session file) attached to OPC Viewer and DataPorter software. To use this configuration, you must have CommServer with the default configuration installed. |
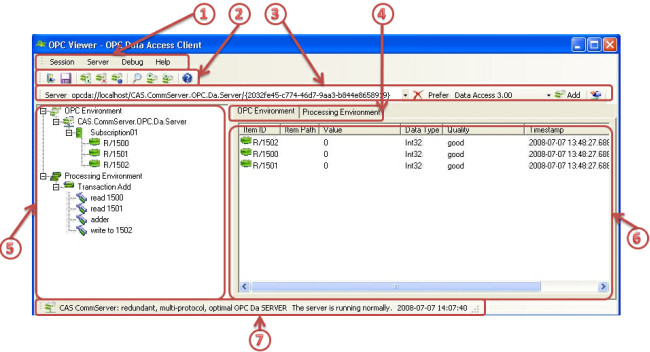
The main window of OPC Viewer is shown below:

Main menu – gives access to all options and functions.
Main tools strip – quick access to main functions like:
Loading(
 ) and saving(
 ) session,
Connecting (
 ), disconnecting (
 ) and requesting for status (
 ) of the selected OPC server,
Browsing (
 ), reading (
 ) and writing (
 ) to OPC server,
About dialog (
 ).
).
Server connect tools strip – this strip allows to select a server to which we want to connect. The server can be selected through the browse network function (
 ) or its address can be written manually in the address bar. It is possible to select preferred specification to be used during connection (Data Access 2.XX or Data Access 3.00). After selecting the server, click on Add (
 ) to add the server to session.
Tab panel selector – depending on the selected tab (OPC Environment or Processing Environment), it changes the view in the main panel (6).
Session tree view – this tree shows the current configuration of the OPC Viewer (more information in “Session Tree View” topic).
Main panel – this panel presents various information depending on the selected tab (6) (more information in “Main Panel” topic).
Server status strip – this strip display status information about the recently selected OPC server.